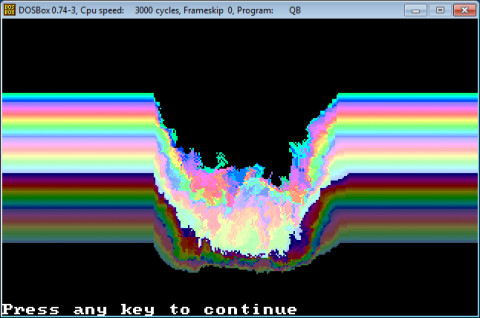
How to Create Melt Effect

Melt is a technique I've been using when developing 2D games to demonstrate the illusion of melting objects. This effect is something that you cannot just do in Photoshop. Some things are better done the hard way giving you more control of the parameters and function behavior. This is another Throwback Thursday's article so I've written it using QBASIC.
The Technique is simple, you can apply it to any bitmap/canvass of any modern graphic libraries that you are using. The basic idea is, given an object you need to:
- Get random rectangular blocks of pixels starting from (x1, y1) to (x2, y2). The area of the block must be within the boundary of the object you want to melt. The object must have some extra space on these borders. The color of the border spaces will be smudged thru the color of the object.
- Move the rectangular blocks below y1 with a random position to give you the effect of a melting object.
- Do this for a number of times and you get an effect similar below.
- Save each frame as a bitmap texture and use it in modern graphic libraries like OpenGL.
Experimenting with different directions of melt could give you something like a moving blob or bacteria.
The program in QBASIC is printed as follows:
faraway = 50 ' How far away you draw a line from the middle
sx = 320 / 2 - faraway ' Left most corner of the line
sy = 200 / 2 - faraway ' Right most corner of the line
meltsize = 30 ' Size of melt box in pixels
meltdirx = 1 ' Melt direction in horizontal position
meltdiry = 1 ' Melt direction in vertical position
randomdirx = 1 ' If set to 1, nmeltdirX may shift to -1 or +1
randomdiry = 0 ' If set to 1, nmeltdirY may shift to -1 or +1
''''''''''''''''''''''''''''''''''''''''''''''''''''''''''''''''''''''''
SCREEN 13 ' 320 x 200 x 256 colors resolution
'
' Draw Lines
'
FOR y = 50 TO 150
LINE (sx, y)-(sx + faraway * 2, y), y
NEXT
'
' Start of Melt Effect
'
asize = 4 + INT(((meltsize + 1) * 8 + 7) / 8) * ((meltsize) + 1)
DIM img(asize)
RANDOMIZE TIMER
nmeltdirx = meltdirx
nmeltdiry = meltdiry
DO
x1 = sx + RND * faraway * 2 - meltsize / 4
y1 = 20 + RND * 130
x2 = x1 + meltsize * RND
y2 = y1 + meltsize * RND
GET (x1, y1)-(x2, y2), img
IF randomdirx = 1 THEN
IF RND > .5 THEN
nmeltdirx = meltdirx * RND
ELSE
nmeltdirx = -meltdirx * RND
END IF
END IF
IF randomdiry = 1 THEN
IF RND > .5 THEN
nmeltdiry = meltdiry * RND
ELSE
nmeltdiry = -meltdiry * RND
END IF
END IF
PUT (x1 + nmeltdirx, y1 + nmeltdiry), img, PSET
LOOP WHILE INKEY$ = ""
The code is pretty much the way I described how it works. Now try and experiment on the parameters of this effect and maybe you can use it in one of your indie games, just don't forget to mention me in the credits. ![]()


